
The goal of this homelab was to create a virtual network to set up an Endpoint Detection & Response system to see if it will pick up attacks that I will perform on a victim machine. EDR systems are commonplace in businesses and other various organizations as they assist in detecting and responding to various cyber threats such as ransomware and other malwares. I feel it is beneficial to be familiar with the technology and learn how to install, configure, and use it to enhance my knowledge and abilities in the cybersecurity space.
In this exercise I used LimaCharlie which is an advanced Endpoint Detection and Response tool which compiles all the Telemetry from the Windows virtual machine I will be setting up. It also acts like a SIEM and can detect incidents at a system level and use rules to automatically generate alerts or respond to them.
Setting up the virtual environment
To start I had to set up the virtual environment and I used VMware to spin up a Windows 11 virtual machine and a Linux virtual machine using Ubuntu Server 22.04.1 which comes with necessary packages already installed.
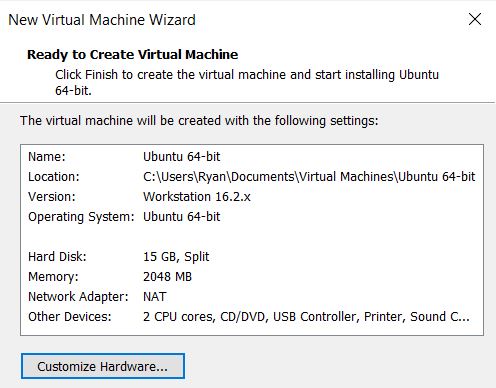
The first step was to open a new virtual machine in VMware for the Ubuntu install with the following specs.
Then I booted up the machine to proceed with the installation and used the default Ubuntu Server option.

Many of the settings were left as default but the Network Connections section had to be configured manually. Using the Virtual Network Editor within VMware I selected the NAT type (Network Address Translation) and made note of the Subnet IP and entered the NAT Settings.
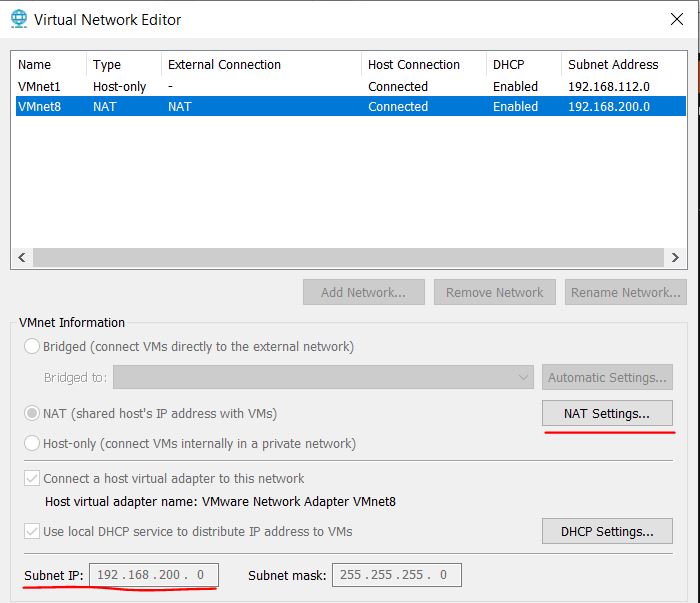
In this menu I took note of the Gateway IP and then exited the Virtual Network Editor.

Back at the Network connections configuration for the Ubuntu installation I changed the interface from DHCPv4 to Manual.
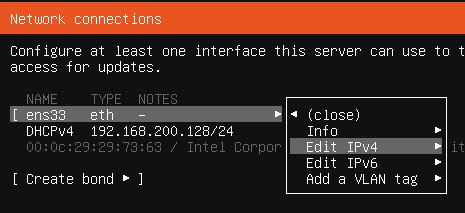

In this menu I set up the virtual machine’s IP to static using the Subnet and Gateway IPs from the previous step and just used Google’s DNS for the Name server setting.
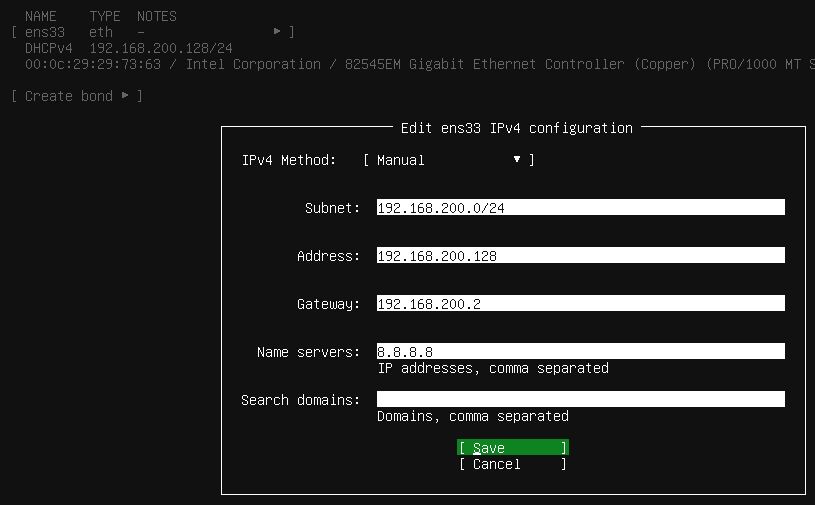
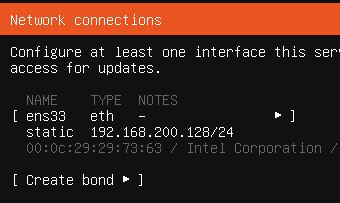
With everything configured correctly I saw that the Ubuntu server’s IP was correctly set as static.
Moving on, I then set up the profile for user access.

I also made sure to install the OpenSSH server.

The rest of the installation was straightforward and after a reboot of the system I logged in with the profile I created and then proceeded to check the network connectivity by pinging google.com and saw that it is working properly as well as DNS.

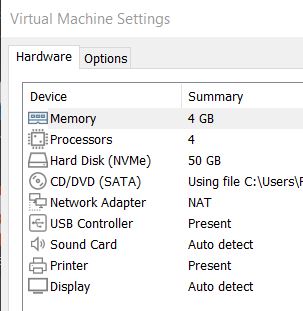
With the Ubuntu virtual machine set up I then turned my attention to the Windows virtual machine. I used the following specs for the Windows system and then used the installation image and booted it up.
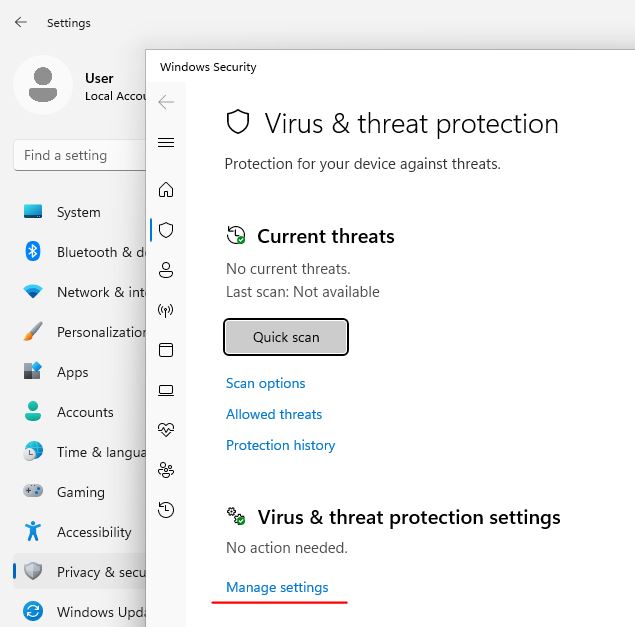
After being logged in as a user I proceeded to completely disable Microsoft Defender. Defender is set up to turn itself back on in most cases so there are a lot of steps to go through to ensure that it remains disabled. The first step is to go to the system Settings and choose the Virus & threat protection menu and then select ‘Manage settings’.
From here I turned off the Tamper Protection as well as all the other options.

I then closed all the open windows and then opened a Command Prompt as Administrator and ran the ‘gpedit.msc’ command to get into the Local Group Policy Editor. From here I went to the following directory: Computer Configuration -> Administrative Templates -> Windows Components -> Microsoft Defender Antivirus and then opened the setting for ‘Turn off Microsoft Defender Antivirus’.
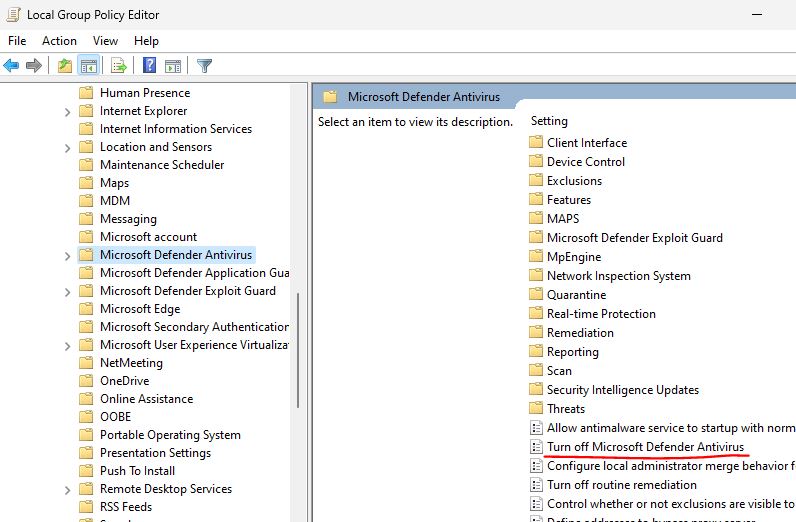
In this menu I chose the ‘Enabled’ option to ensure that Microsoft Defender Antivirus will no longer scan for malware or other hazardous software.
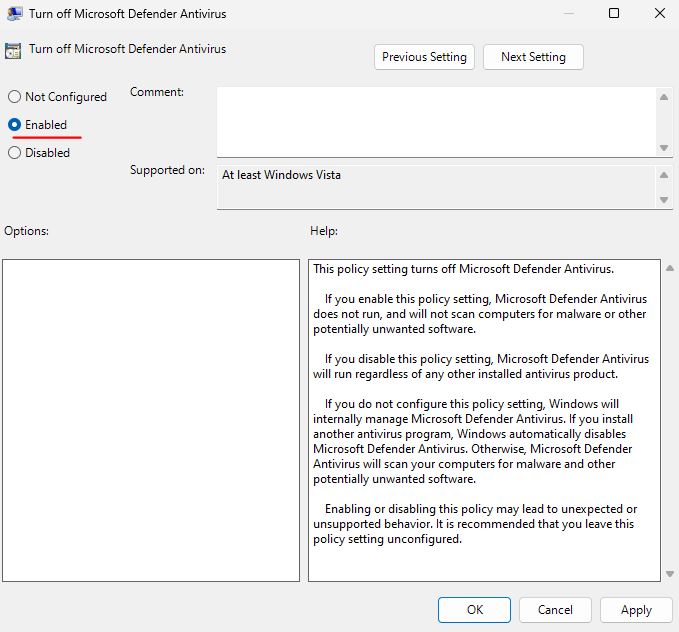
After applying that setting, I went back to the administrative command prompt to enter the following command which permanently disabled Defender via the Registry.
REG ADD "hklm\software\policies\microsoft\windows defender" /v DisableAntiSpyware /t REG_DWORD /d 1 /fI also changed some additional settings to prevent the virtual machine from going into sleep or standby mode during the activities to come later.
powercfg /change standby-timeout-ac 0powercfg /change standby-timeout-dc 0powercfg /change monitor-timeout-ac 0powercfg /change monitor-timeout-dc 0powercfg /change hibernate-timeout-ac 0powercfg /change hibernate-timeout-dc 0The next step to disable all the Defender services requires the computer to be booted up in ‘Safe Mode’ which can be done by going to the System Configuration menu. From there I went to the ‘Boot’ tab and selected ‘Safe boot’ and ‘Minimal’ and then rebooted the system.
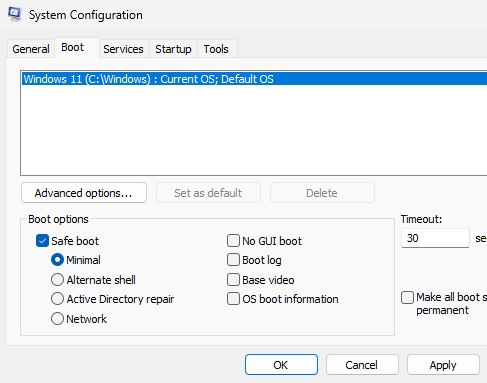
With the system now in Safe Mode I went to the Registry to disable the aforementioned services. This was done by navigating to the respective registry locations, locating the key and adjusting the ‘Start’ value to ‘4’.
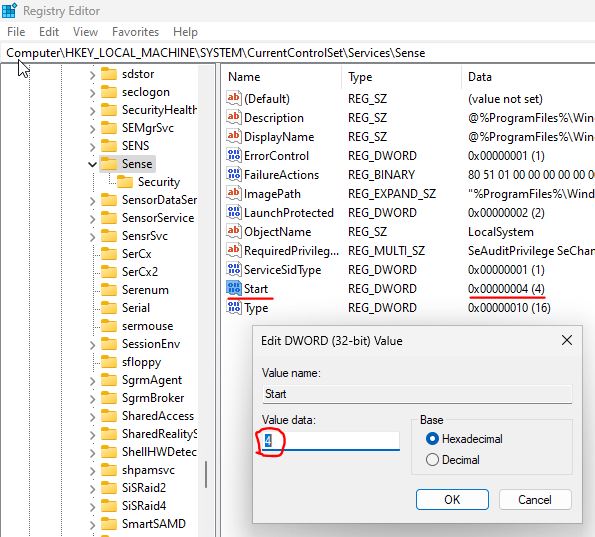
These are all the services that were adjusted.
Computer\HKEY_LOCAL_MACHINE\SYSTEM\CurrentControlSet\Services\Sense
Computer\HKEY_LOCAL_MACHINE\SYSTEM\CurrentControlSet\Services\WdBoot
Computer\HKEY_LOCAL_MACHINE\SYSTEM\CurrentControlSet\Services\WinDefend
Computer\HKEY_LOCAL_MACHINE\SYSTEM\CurrentControlSet\Services\WdNisDrv
Computer\HKEY_LOCAL_MACHINE\SYSTEM\CurrentControlSet\Services\WdNisSvc
Computer\HKEY_LOCAL_MACHINE\SYSTEM\CurrentControlSet\Services\WdFilter
With that task completed I turned off Safe Mode by the same method I used to turn it on and then rebooted the system. At this point Microsoft Defender was completely disabled.
The next step was to install Sysmon (System Monitor) on the Windows system. Sysmon is a tool that provides enhanced monitoring and logging of system activity to the Windows event logs. I used the LimaCharlie EDR to collect this telemetry for further detection and response which I will get into later in this walkthrough.
In order to install Sysmon I opened a PowerShell console with administrative rights and used this command to download it.
Invoke-WebRequest -Uri https://download.sysinternals.com/files/Sysmon.zip -OutFile C:\Windows\Temp\Sysmon.zipI unzipped it with this command.
Expand-Archive -LiteralPath C:\Windows\Temp\Sysmon.zip -DestinationPath C:\Windows\Temp\SysmonI then downloaded the following Sysmon config and installed it.
Invoke-WebRequest -Uri https://raw.githubusercontent.com/SwiftOnSecurity/sysmon-config/master/sysmonconfig-export.xml -OutFile C:\Windows\Temp\Sysmon\sysmonconfig.xmlC:\Windows\Temp\Sysmon\Sysmon64.exe -accepteula -i C:\Windows\Temp\Sysmon\sysmonconfig.xmlAfter installing it I checked to make sure it was running.
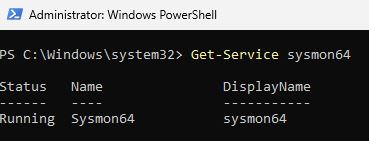
And then checked for the presence of the Sysmon Event Logs with this command.
Get-WinEvent -LogName "Microsoft-Windows-Sysmon/Operational" -MaxEvents 10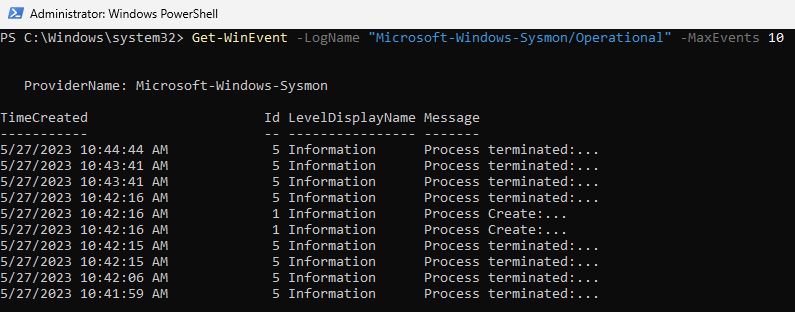
Installation of LimaCharlie EDR
The next section will go over the installation of LimaCharlie on the Windows virtual machine.
In LimaCharlie’s website I created an account, logged in, and then created a new organization, which are all straightforward steps. Then it was time to install the first Sensor.

I chose Windows and gave it a description and then selected ‘Create’. With the new Sensor selected I chose the option for ‘x86-64 (.exe) for the installer.
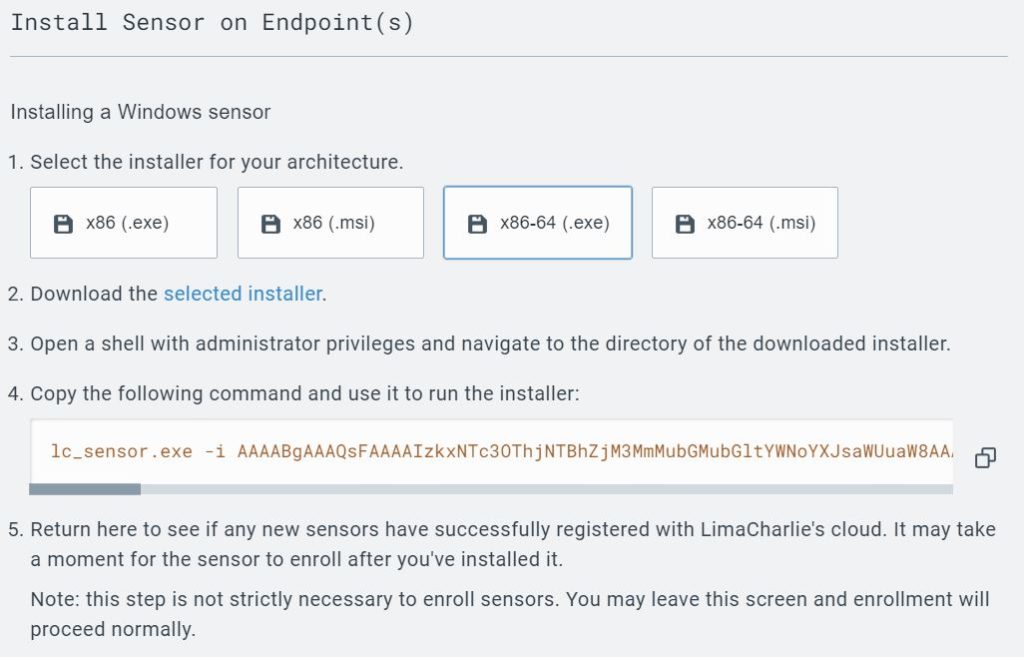
Back in the Windows machine I opened another administrative PowerShell and ran these commands to download the sensor.

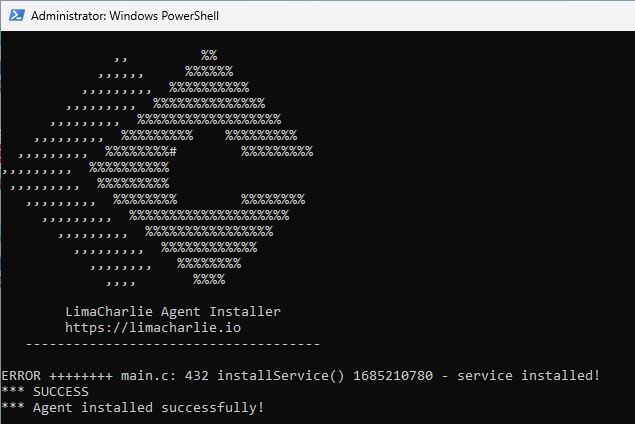
Then copied the command from the LimaCharlie set up and ran it in the PowerShell terminal.

Despite the error message this is how it looked when it installed successfully.
I was then able to see that the sensor was online in the LimaCharlie dashboard.

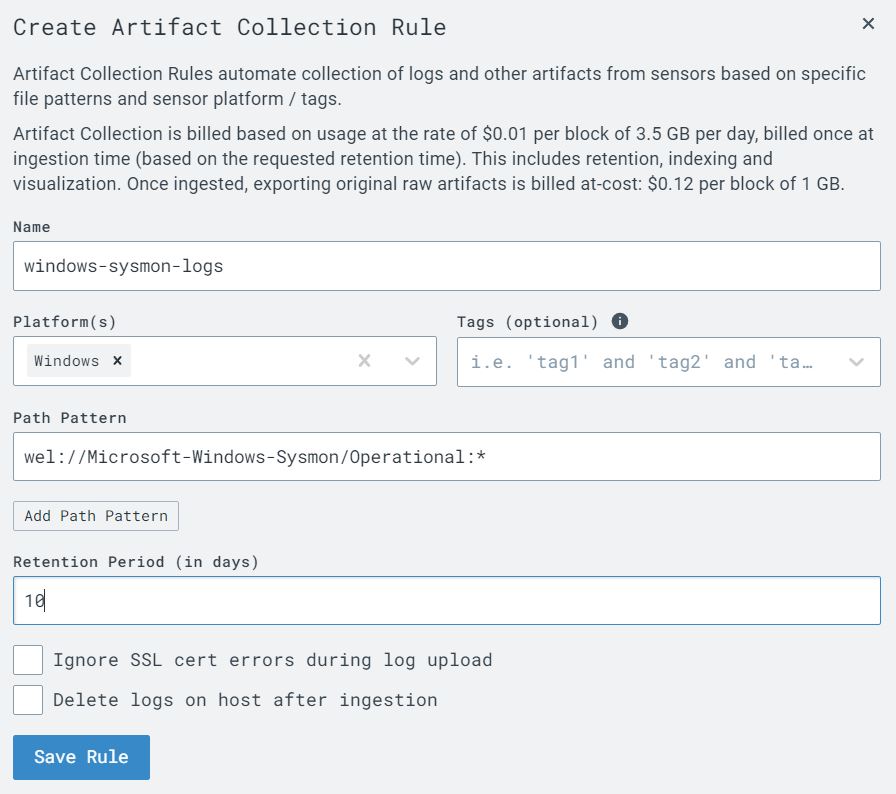
The next step was to configure LimaCharlie to send the Sysmon event logs from the Windows VM in addition to the telemetry it already collects. To do this I opened the ‘Artifact Collection’ page from the left-side menu and then selected the option to ‘Add Artifact Collection Rule’ and filled out the required fields and saved the new rule.
At this point I was done configuring LimaCharlie and just had to set up my C2 with the Linux VM to be able to start attacking the Windows VM and then be able to view the telemetry.
I started by accessing the Linux VM using SSH and accessing root and then installed Sliver which is a C2 system made for penetration testers and any cybersecurity enthusiasts.
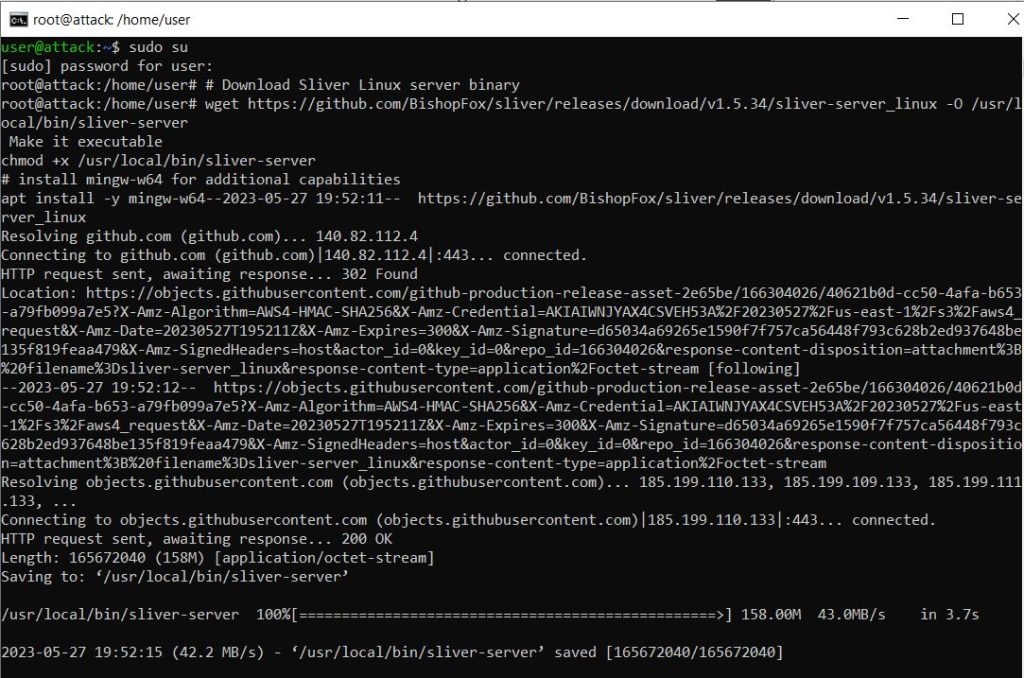
And I also created a new directory to work out of.

At this point the virtual machines were set up and LimaCharlie was installed and ready to start detecting. In the next part I’ll go over the various attacks I made against the Windows machine and show how LimaCharlie detects and responds to them.


